
Easy Carrot Puff Pastry Appetizers for Your Easter Table
One pastry, two fillings, and a table favorite every time
Listen — don’t let the carrot shaped puff pastry fool you.
These are EVERYTHING.
Not only am I a fan of the flair and drama of these, but they are just so good and grabbable. It’s the perfect thing to add to your Easter or Spring table, especially when you want to delight your guests.
The best part? There’s something for everyone.
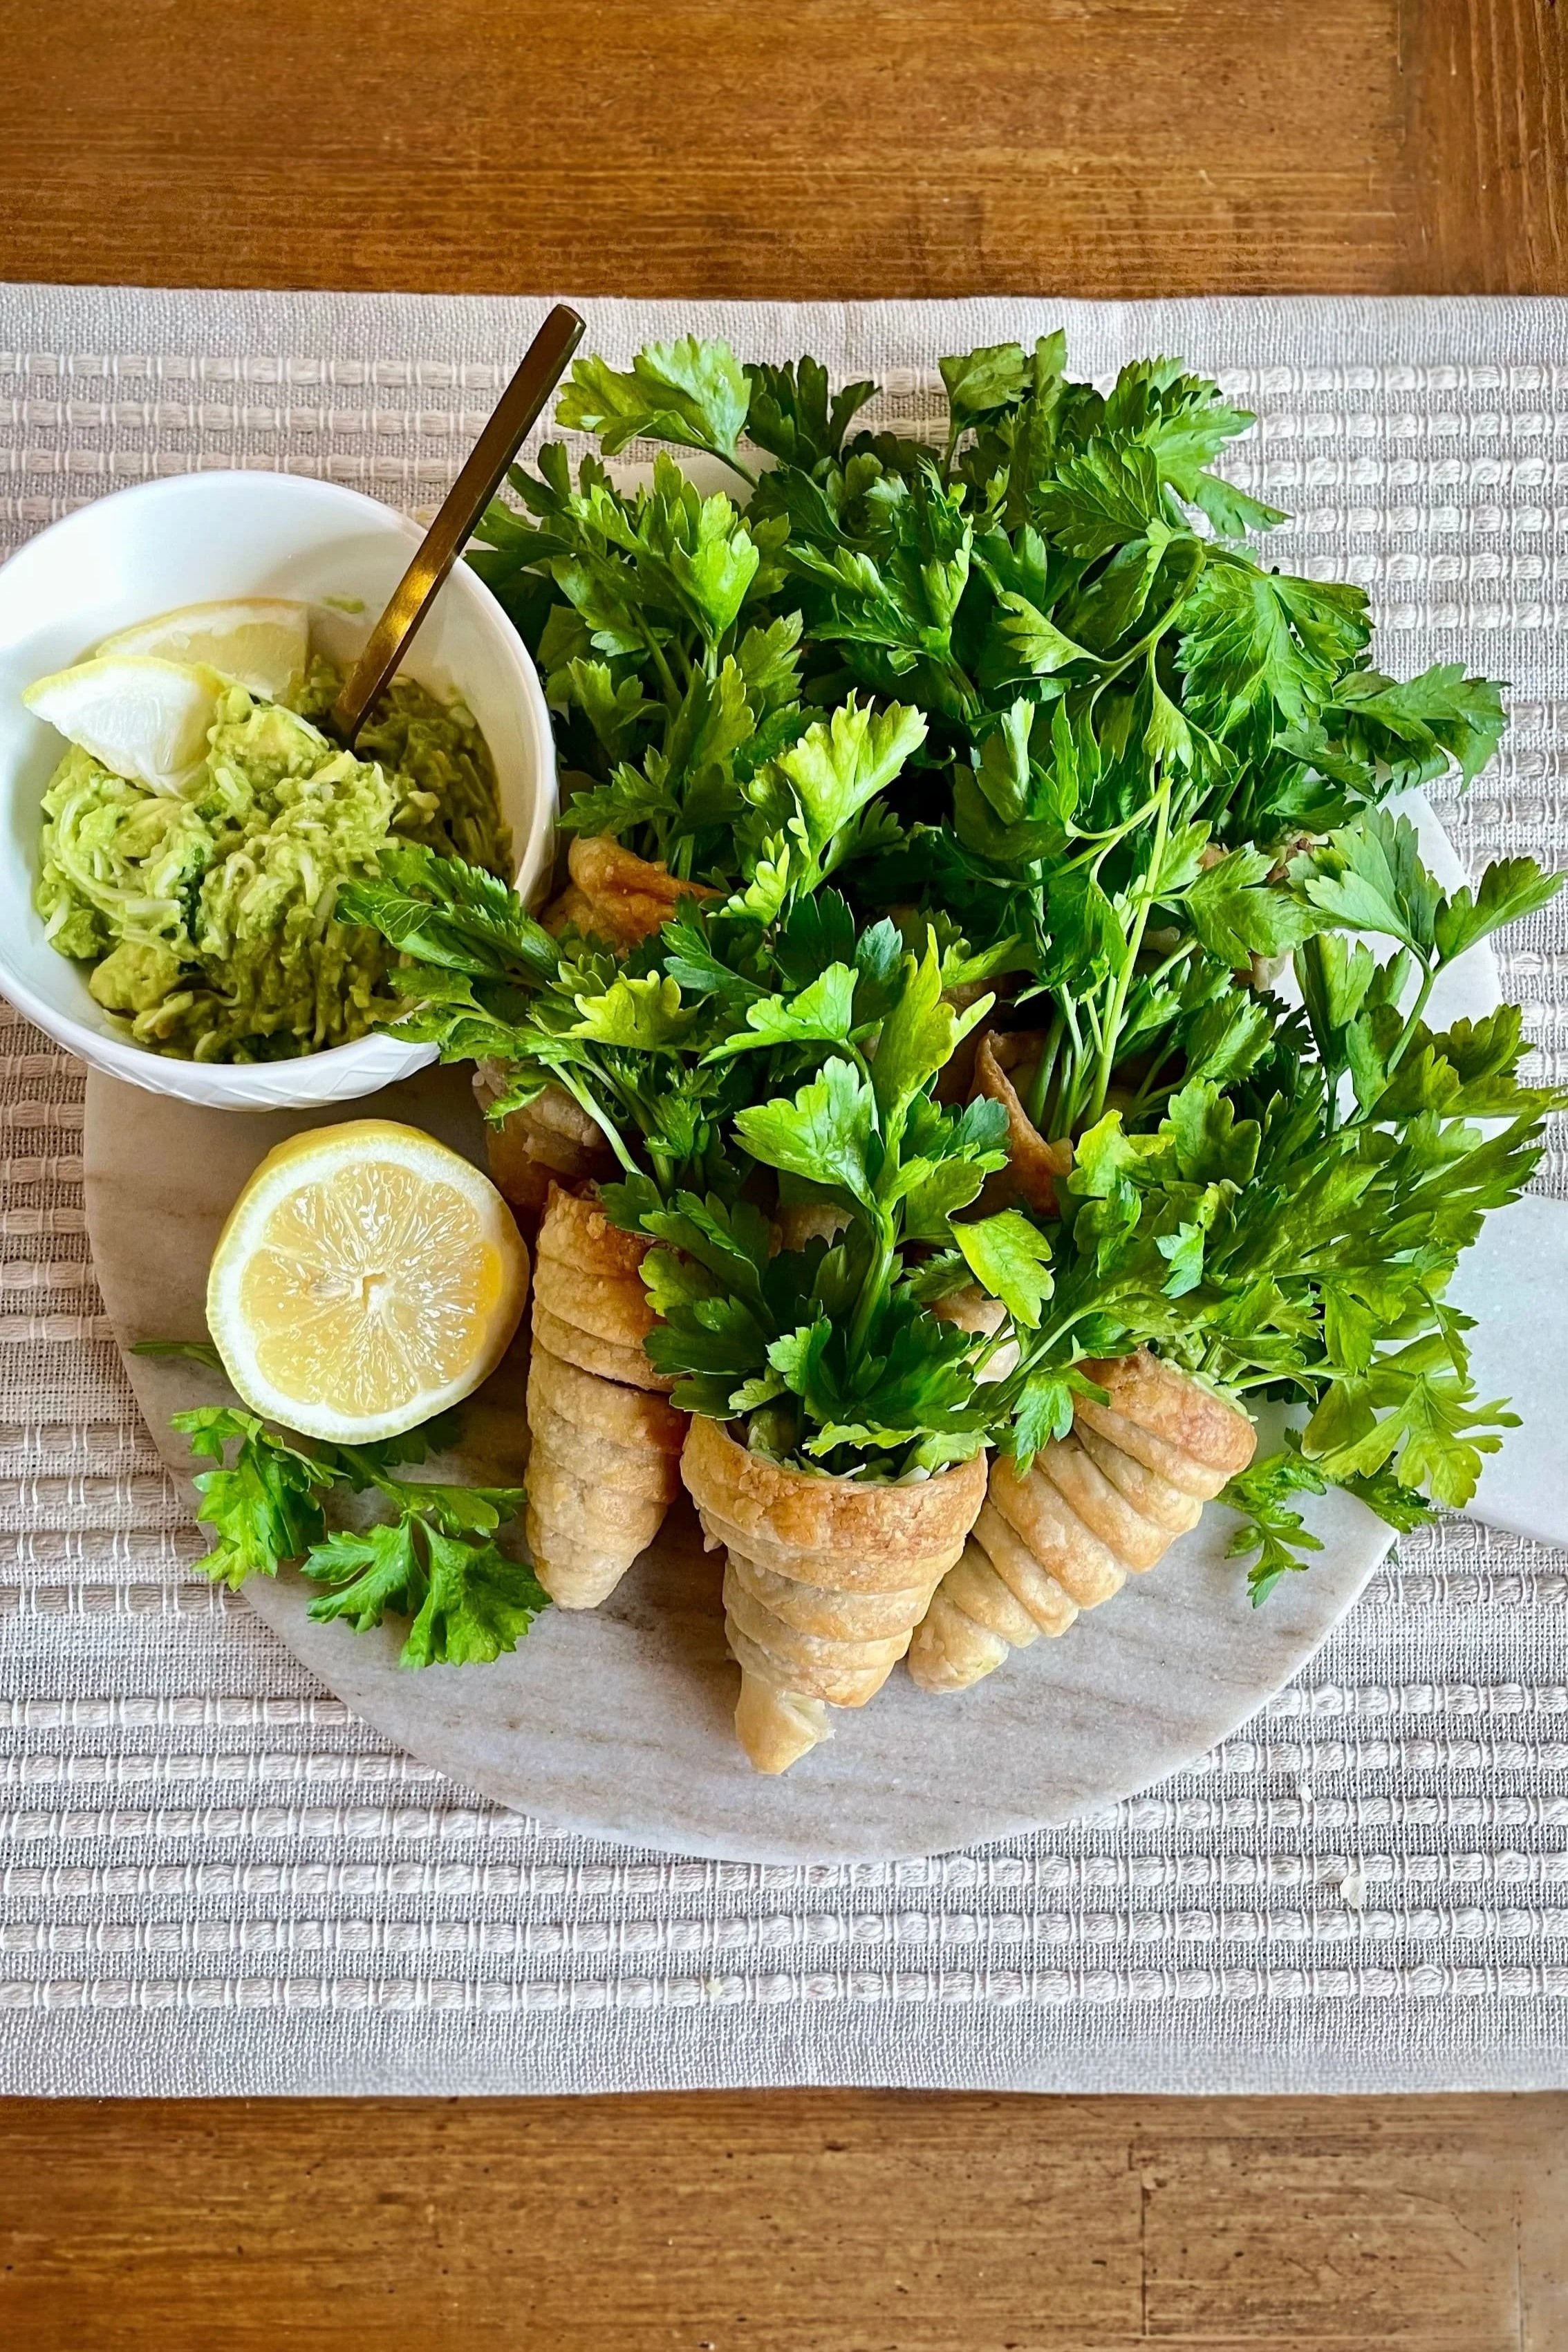
Fill these flaky, buttery carrots, two ways — one with warm and melty Prosciutto & Gruyere, or try cool, fresh avocado with a little heat.
The assembly is so easy, you don’t have to worry about complicated techniques or fancy equipment.
Just puff pastry, good ingredients, and a little patience while they bake into the most gorgeous thing you've put on a table.
I'm serving both versions on our Easter table this year and I already know they're going to disappear!
Enjoy, Darling!
With Love,
Ambyr
These carrots are featured in the Ambyr Things Spring & Easter Catalog. Subscribe to get your free copy delivered straight to your inbox — or grab it here. 🤍

Puff Pastry Carrots
What’s In It
Serves: 8–10
Prep Time: 25 minutes
Bake Time: 18–22 minutes + 3–4 minutes to melt the cheese
Total Time: ~55 minutes
Ingredients
For the pastry:
2 sheets store-bought puff pastry, thawed
1 egg, beaten (for egg wash)
10–12 cone-shaped molds (or make your own with aluminum foil)
Fresh parsley sprigs (for the carrot tops)
For the Prosciutto + Gruyere filling:
3–4 oz prosciutto (6–8 thin slices)
6–8 slices gruyere, deli sliced or shredded (available at Whole Foods)
For the Spicy Avocado Green Goddess filling:
3 ripe avocados
¼ cup fresh basil, roughly chopped
¼ cup fresh parsley, roughly chopped
Juice of 1 lemon
1 tsp white wine vinegar, ACV substitute works also
1 small garlic clove, minced
½ jalapeño, seeded for mild or kept for more heat
Drizzle of good olive oil
Salt and pepper to taste
Optional
Shredded Cheese


How To Make It
Instructions
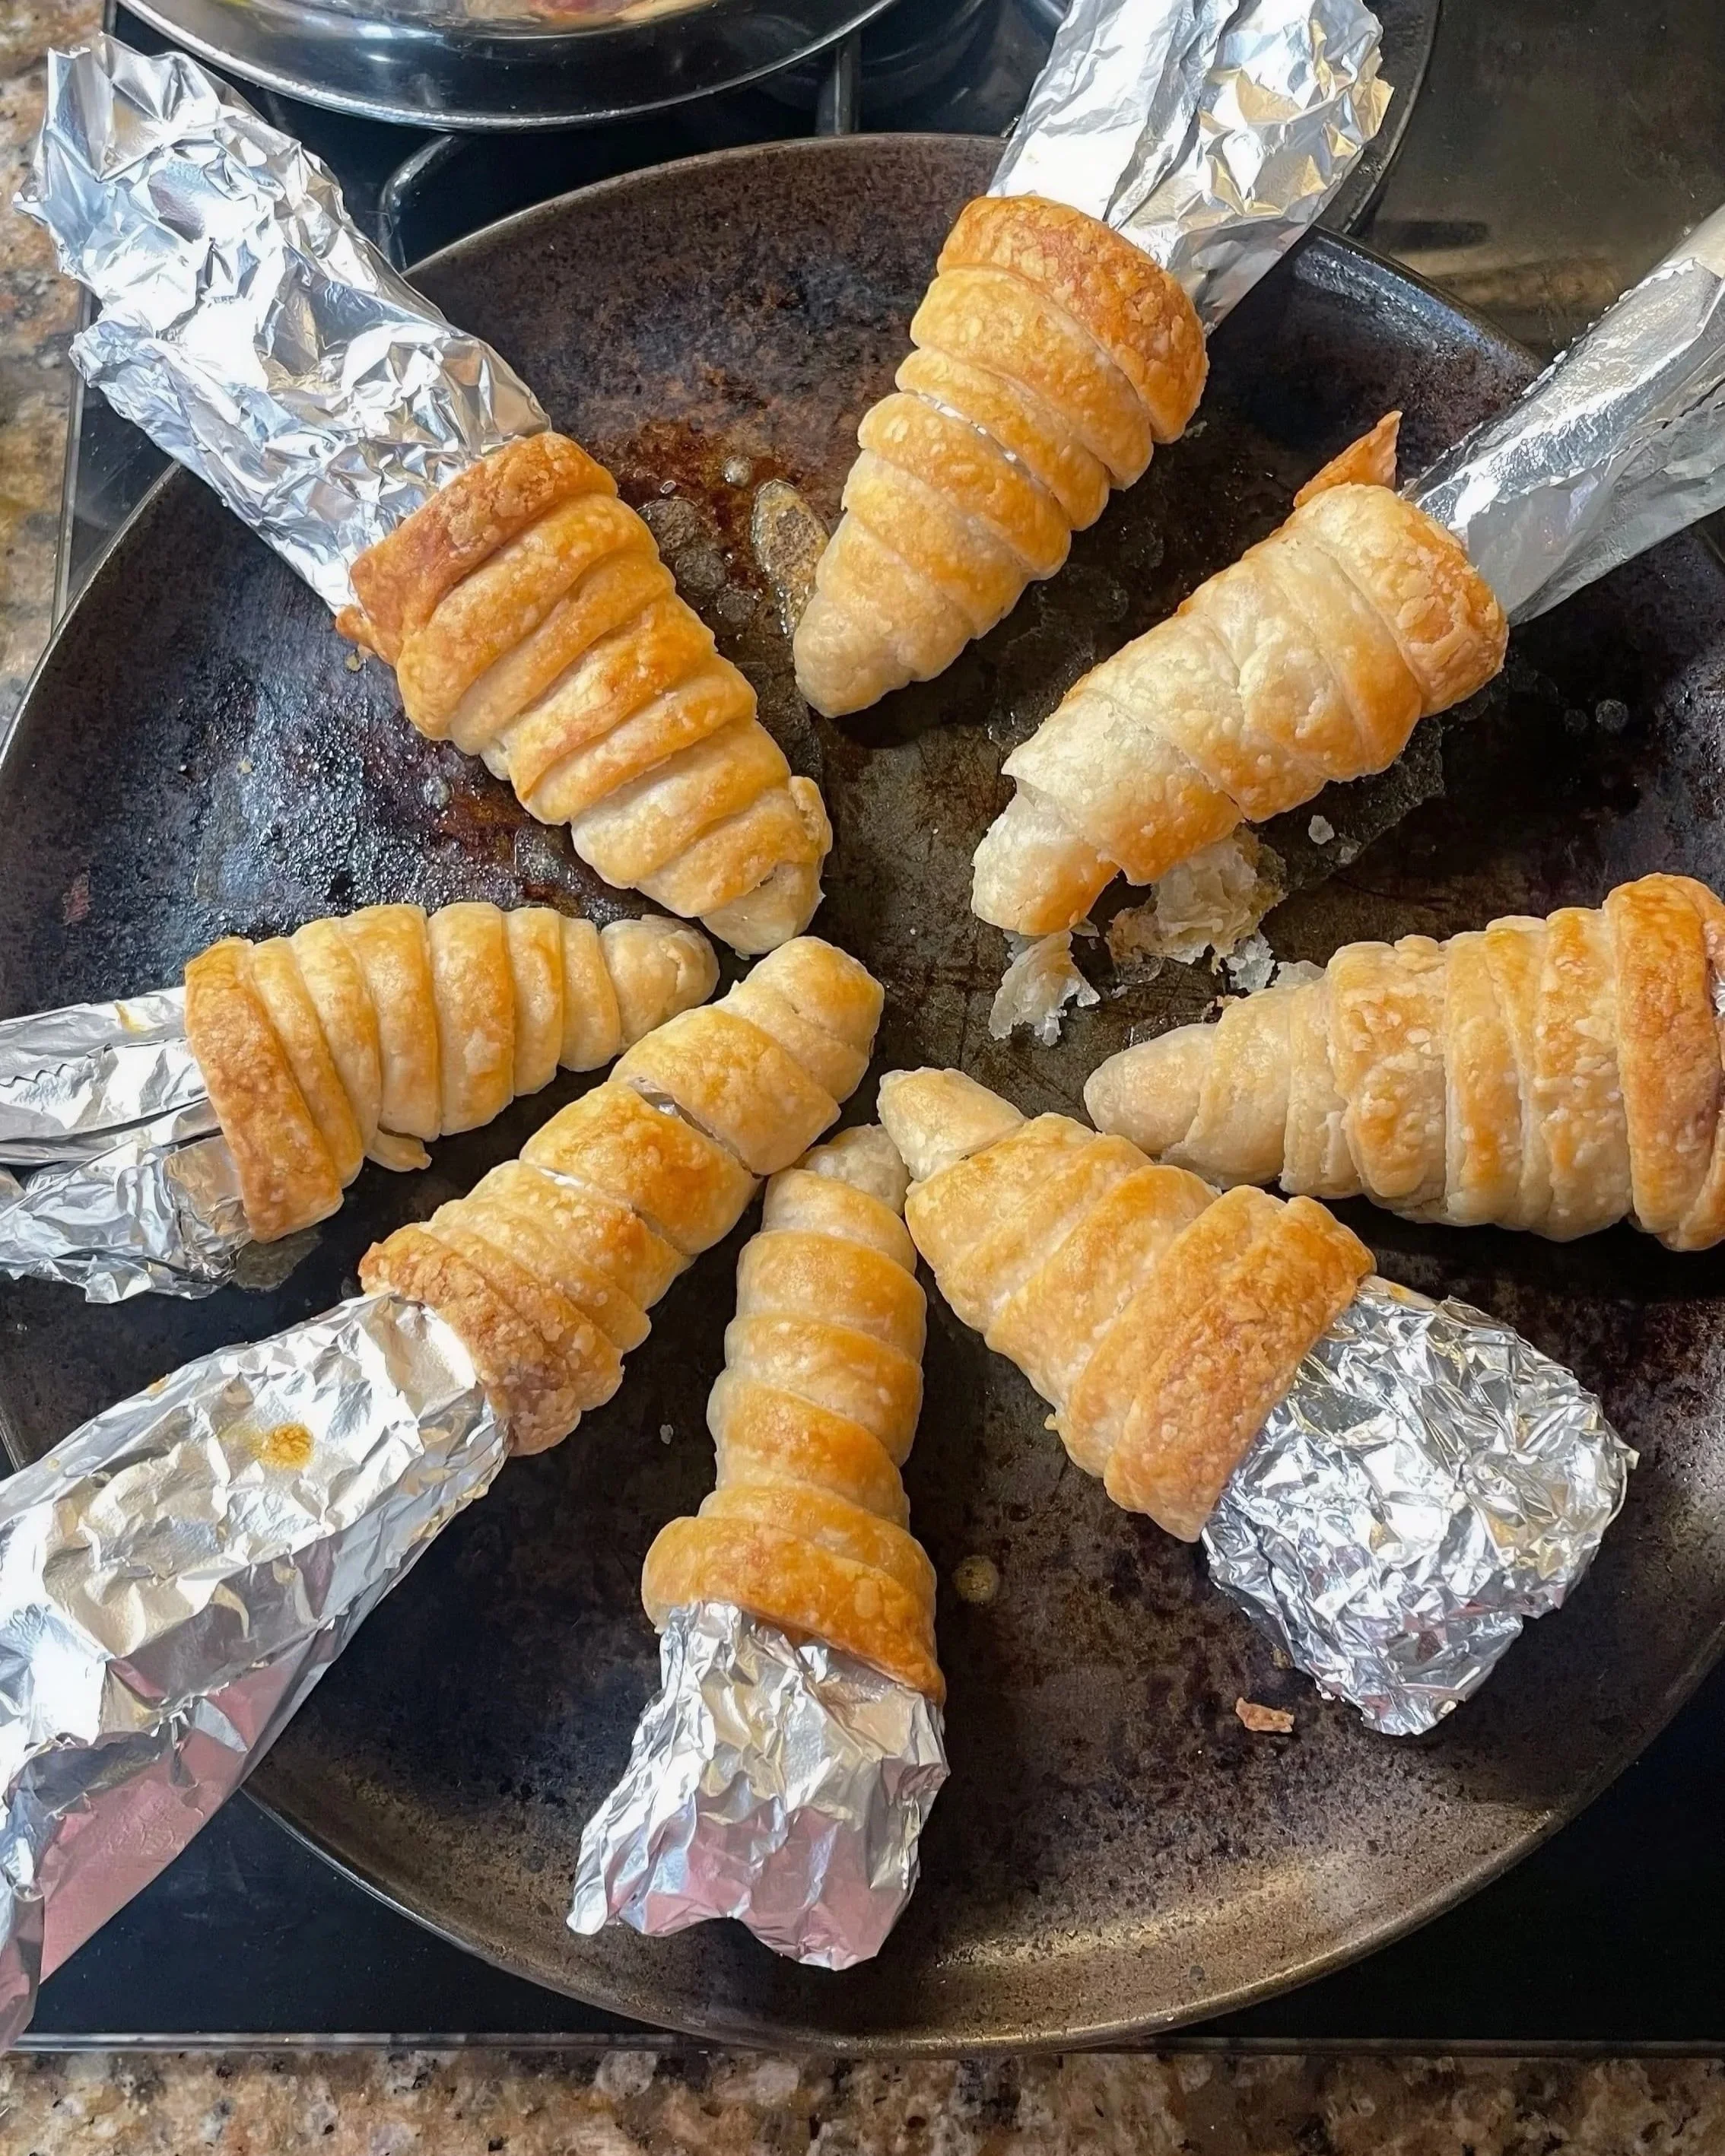
Step 1 — Make your cone molds. If you have cone molds, lightly grease them with cooking spray. If not — no worries. Tear off sheets of aluminum foil and roll them into tight cone shapes approximately 4–5 inches long (about the length of your hand from palm to fingertip). Set aside on a cookie sheet.
Step 2 — Prep your puff pastry. Thaw your puff pastry according to package instructions — it should be cold but pliable, not warm or sticky. On a lightly floured surface, unfold each sheet and cut into long strips approximately 2 inches wide (about as wide as two fingers pressed together).
Step 3 — Wrap the cones. Starting at the pointed tip of each cone, wrap a strip of puff pastry tightly in a spiral, slightly overlapping each layer as you work your way toward the wide opening. Press the end gently to seal. Repeat until all cones are wrapped.
Step 4 — Egg wash and bake. Brush each wrapped cone generously with beaten egg for that gorgeous golden shine. Bake at 400°F for 18–22 minutes until deeply golden and flaky. Watch them closely in the last few minutes — puff pastry goes from perfect to overdone quickly.
Step 5 — Cool and remove molds. Let the baked cones cool for 5 minutes then carefully slide them off the molds or foil. They should release easily. Set upright on your cookie sheet — a small ball of foil underneath each one helps them stand up while you fill them.
Step 6 — Fill the prosciutto + gruyere cones. Take 1–2 slices of prosciutto and layer with gruyère (sliced is easiest here). Roll into a small bundle and gently tuck it into the warm cone. The residual heat will start melting the cheese right away.
If your cones have cooled, you can warm the filling for 10–15 seconds in the microwave before adding, or place the filled cones back on a baking sheet, loosely tent with foil, and return to the oven for a 2-3 minutes until the cheese is soft and melty.
Step 7 — Add the parsley tops. Remove from the oven and while the cheese is still warm and slightly sticky, tuck a fresh parsley sprig into the wide opening of each cone. The melted cheese anchors it in place naturally. ✨
Step 8 — Make the green goddess filling. Mash the avocados in a bowl until mostly smooth with some texture remaining — think chunky guacamole, not baby food. Finely chop the basil, parsley, and jalapeño and fold them in. Add the garlic, lemon juice, white wine vinegar, and a drizzle of olive oil. Season generously with salt and pepper. Taste and adjust — more lemon for brightness, more jalapeño for heat.
Step 9 — Fill the green goddess cones. Spoon or pipe the green goddess filling into each remaining cone right before serving. Tuck a parsley sprig into the top of each one the same way.
Step 10 — Plate and serve. Arrange both varieties together on a wooden board or serving platter, alternating between the two fillings so the spread looks intentional and editorial. Serve immediately.

A Few Notes
Keep your pastry cold. Warm puff pastry loses its layers and won't puff properly. If it gets too soft while you're working, pop it back in the fridge for 10 minutes before continuing.
Tent the whole tray. When you return the prosciutto cones to the oven, loosely tent the entire cookie sheet with foil. This is the move that protects your beautiful golden pastry while the cheese melts inside.
Fill the green goddess cones last. Avocado oxidizes, so fill these right before serving for the freshest color and flavor.
The jalapeño heat is adjustable. Start with half a seeded jalapeño and taste as you go. You want warmth, not fire — unless fire is your thing. No judgment. 🌶️
Standing them up. A small ball of foil tucked under each cone keeps them upright while you fill and plate. Simple but game changing.
No cone molds? The aluminum foil method works beautifully. Don't let the lack of equipment stop you from making these.